Mac Os X Usb Drive Read Only
Read Fourth dimension: 4 mins Languages:
More than and more than people are finding themselves using both Macs and Windows based PCs. While compatibility is almost a not-issue now days between Macs and PCs, also as Macs and third party peripherals, there is one area that may still crusade confusion. In this tutorial I will explain the "Read Simply" error you may run into while using external storage devices, and as well show y'all how unproblematic it is to fix.
Quick Tip: Solving "Read Only" External Drive Bug on Your Mac
The Cause of "Read Only" Disk Errors
I accept a USB drive that I purchased and utilise with various PCs at work and school. I am able to open the drive and can fifty-fifty copy files from the drive. Only if I effort to copy a file to the drive on my Mac, I get an icon telling me that I am non able to re-create the file. If I try to delete a file, by pressing Command+Delete, nothing happens and, if I right click the file, the pick to move it to the trash can is missing. Something is obviously not right with the storage drive.


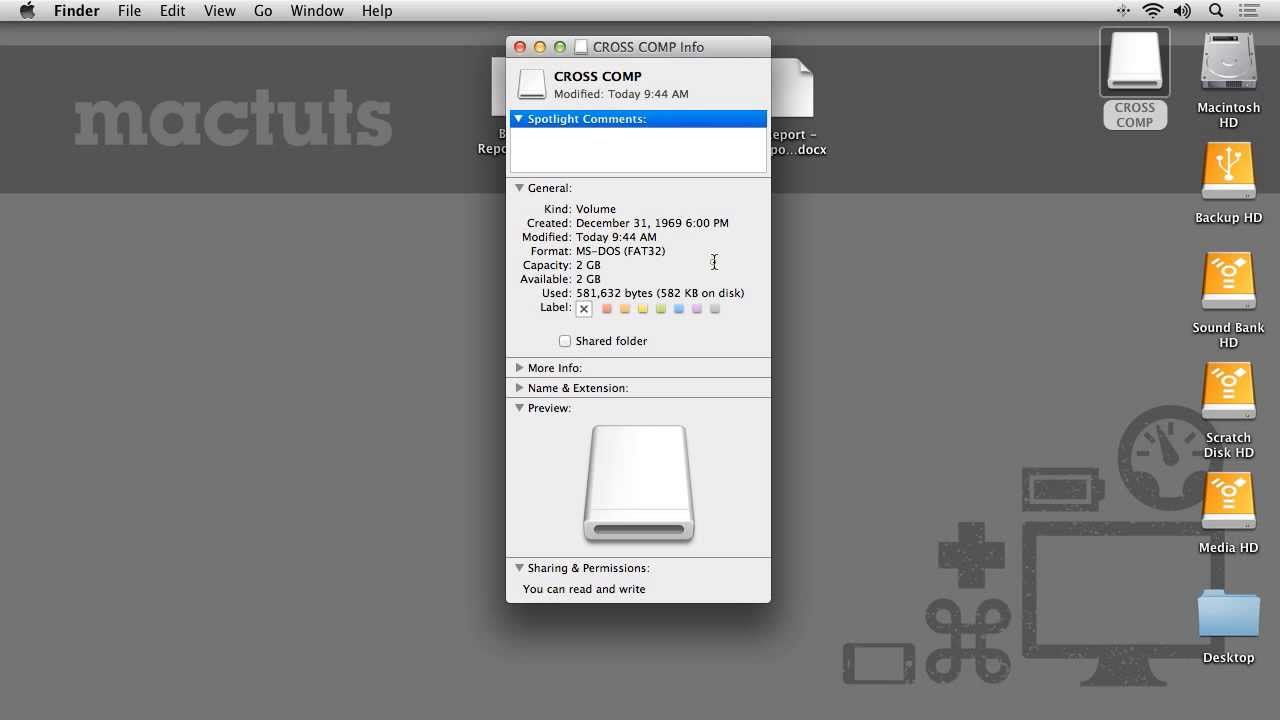
If you right click the drive and select Become Info, you lot can see at the bottom of the info window nether the sharing and permissions twirl downwards, you only have permission to read from this bulldoze and nothing else.


The cause of this is due to the filing system the storage device is formatted in. If yous await in the general twirl-down under format you lot tin can see that this drive is formatted in the windows NT file system. The NTFS file system is a system specifically optimized for Windows in the way that it organizes the data on the bulldoze. While this file system is readable on Macs because OS 10 can rearrange the data as information technology is reading it, the way that NTFS writes the files to the storage device is not; hence, yous tin can read, simply not write.


Many storage devices such as USB drives and external difficult deejay drives come pre-formatted in NTFS considering a larger number of consumers are using them on PCs. However, making your storage device Mac compatible, and even cross uniform with Macs and PCs, is as simple equally reformatting the drive.
Correcting the "Read Only" Deejay Error
First and foremost earlier proceeding whatever further, y'all are about to format your storage device. Be sure to copy whatsoever and all file from the drive as all the data on the drive volition be erased. This can exist a uncomplicated task or a long undertaking depending on the size and usage of the storage device, just is a necessary and important step.
Y'all tin can reformat a hard drive on Mac Bone X by using Disk Utility. In the left-hand side inside of Deejay Utility you volition see a list of all the connected hard drives. Each physical bulldoze is shown with the partitions of that drive nested below. Highlight the concrete bulldoze you wish to reformat and on the menu at the top to the right select erase.
You are about to format your storage device. Be sure to copy any and all file from the bulldoze as all the data on the drive will be erased.


You lot will run into two fields where you can choose a file system format and a field to proper name the new partition you are going to create. If you are just going to use your drive on Mac computers, you tin can select one of the Mac OS options. If you wish to create a division that is cantankerous compatible with Mac computers as well as PCs, yous can select either the MS-DOS Fils Organisation format or the exFAT format. You can rename the difficult drive to whatsoever descriptive name you like and then click erase and now the drive is formatted in a cross compatible filing system. If you click on the drive and select get info you can now see that the permissions are gear up to read and write.


Decision
The NTFS file system format is a great format to use if you lot are using your drive solely on Windows based PCs. Simply if you need to use your bulldoze on Mac Os, or on both PCs and Mac Bone, NTFS volition unfortunately not be the best format to employ. In this tutorial I've identified the crusade of the "read but" error that Mac users may find when using external storage devices, and as well how to easily fix the problem by reformatting your drive to a fully Mac Os compatible format.

Source: https://business.tutsplus.com/tutorials/quick-tip-solving-read-only-external-drive-problems-on-your-mac--mac-52507
0 Response to "Mac Os X Usb Drive Read Only"
Post a Comment